Planting Trees
In order to maintain a healthy and vibrant urban forest, it's important to have a diversity of tree species and ages. We need to continually plant new trees to replace those lost to drought, old age, disease, insects, and injury. If we eliminate all tree planting, we risk losing our valuable urban forest and the many benefits it provides on a daily basis.
Planting trees & shrubs during drought conditions can be risky. However, we can be more successful if we proceed with care and adopt a more sustainable landscape management technique called xeriscaping. Additionally, the Community Tree Alliance recommends using smaller trees (2 inches or less in diameter for deciduous trees and 6 feet or less in height for evergreen trees) to minimize investment risk. Also, using smaller planting stock can result in earlier establishment and lower maintenance of the plantings over time.
When planting young trees, it is important to consider how large the trees will be at maturity. Each tree variety will have certain size and shape characteristics. In order for your trees to thrive in the urban landscape, they must be given enough space to grow to their adult size. Also, they should be properly planted where site conditions closely match the tree's environmental requirements.
The ideal time to plant a tree is during the dormant season in the fall after leafdrop or in early spring before bud-break. Temperatures are generally cooler and allow the plants to establish roots in the new location before spring rains and summer heat stimulate new top growth. Planting during the summer can also be successful but has a greater risk and requires more irrigation.
-
Decide how deep to plant the tree
The tree's Root Collar or Trunk Flare is the bulge just above the root system where the main woody roots spread at the base of the tree. This point should be partially visible above the top of the soil after the tree has been planted. Many trees are planted too deeply at the nursery. If the trunk flare is not partially visible, you may need to remove some of the soil from the top of the root ball. Find the trunk flare so you know how deep the hole needs to be for proper planting.
-
Prepare the planting site
Dig a shallow but wide saucer-shaped hole 2 - 3 times larger than the root ball, but no deeper than the root ball. It is important to make the hole wide because the roots on the newly planted tree must push through the surrounding soil to get established in the landscape. On many planting sites in new developments, the existing soils have been compacted by the construction process and are not very suitable for healthy root growth. You can greatly help your tree get established by breaking and loosening the soil over a large area.
Before planting in areas with underground utilities, contact the Utility Notification Center of Colorado at 1-800-922-1987.
Don't dig the hole too deep. It's better if the trunk flare is 1 - 3 inches higher than ground level if the drainage is poor. Do not disturb the soil beneath the root ball.
![Diagram of a Tree Planting]()
(Courtesy of The International Society of Arboriculture)
-
Place the tree at the proper depth so the root flare is at grade or higher.
Before placing the tree in the hole, make sure the hole has been dug to the proper depth and no deeper. Most of the important fine absorbing roots will develop in the upper 12 inches of the soil. If the tree is planted too deeply, the roots will have a difficult time getting established due to a lack of oxygen which is critical for root respiration. To avoid damage to the tree, lift or move the tree by the root ball and never by the trunk.
-
Straighten the tree in the hole if necessary by handling the root ball, not the trunk.
Before you begin backfilling the planting hole, make sure the tree is straight. View the tree from several different directions to make sure. It will be difficult to reposition the tree once you begin to backfill the hole.
-
Backfill the hole, gently but firmly.
When the tree is positioned correctly, backfill the hole about 1/3 full with the soil that was removed. As the backfill is added, gently push the soil around the roots or water the soil to eliminate air pockets. Do not pack the soil after you water.
If the tree is balled-and-burlapped, cut and remove the string and wire basket from around the trunk and the top 2/3 of the root ball. Remove the nails holding the burlap together and gently fold the burlap back. Carefully, cut away the loose burlap from the top 1/3 of the root ball. Be sure not to damage the trunk or roots.
If the tree is in a plastic container, carefully remove the tree from the container and gently tease or loosen any spiraling or circling roots.
Continue to backfill the hole, gently tamping or watering the soil to eliminate air pockets that may cause the roots to dry out. Backfill to the height just below the trunk flare. Do not plant the tree too deep!
-
Stake the tree, if necessary.
Generally, staking for support is not necessary if the tree was grown and dug properly at the nursery. Research has shown that young trees will establish more quickly, develop a stronger trunk & root system, and develop a more natural trunk taper if they are not staked at the time of planting. However, protective staking may be necessary on sites where there is a possibility of lawnmower damage, vandalism or windy conditions. If staking for support is necessary, use 2 support stakes in conjunction with a flexible tie attached to the top of each stake. This method will hold the tree upright, provide flexibility for tree movement, and minimize injury to the trunk. Be sure to remove the support staking and ties after the first year of growth.
![Elm Tree with Mulch]()
![Soaker Hose around newl-planted tree]()
-
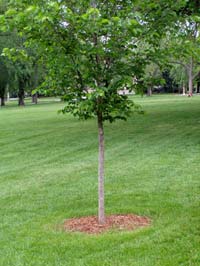
Be sure to mulch your trees.
A 2-4 inch layer of organic mulch reduces soil moisture loss from evaporation, moderates soil temperature extremes (hot and cold), reduces competition from grass & weeds, improves soil aeration & soil structure, adds organic material to the soil, and will help prevent lawnmower & weed whip damage to the trunk. Apply organic mulch within the dripline, to a depth of no more than 4 inches.
A layer of mulch deeper than 4 inches may cause problems with gas exchange. Leave a 3-4 inch space between the mulch and trunk of trees. If the mulch comes in contact with the tree trunk, decay causing fungi and insect pests may cause serious damage to the tree. Mulch materials may include wood chips, bark, leaves and evergreen needles.
Eliminate turf under trees prior to adding mulch. Use "glyphosate" herbicide taking care not to apply it to tree foliage including trunk sprouts. Ask your nursery professional for recommended brands.
For more information on mulching, refer to the Proper Mulching Techniques brochure developed by the International Society of Arboriculture.
-
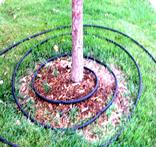
Water your new tree correctly.
Water is the single most important requirement for a newly planted tree. Apply water so it moistens the critical root zone to a depth of 12 inches. Methods for watering include a soaker hose (preferred method), deep root fork, deep root needle or soft spray wand. Apply water to many locations under dripline. If a deep root fork or needle is used, insert the device no deeper than 8 inches into the soil.
-
Properly prune your newly planted tree.
At planting time, you should carefully inspect your newly planted tree and remove any broken, dead, wounded, rubbing or disease-infested branches. Please refer to How to Prune Trees, developed by the USDA Forest Service (Northeastern Area State and Private Forestry). This brochure provides detailed information on how, when & why to prune in order to produce strong, healthy and attractive plants.